With Wordpress now being extremely popular, it is often the target of concentrated attacks on the wp-login page. An extra level of security is required to help prevent your site being compromised.
In this article, we will show you a step by step guide on how to add an extra level of password security to your WordPress admin (wp-admin) directory to help mitigate these attacks.
Login to your cPanel. Scroll down till you see the Security tab, and click on the “Password Protect Directories” icon.
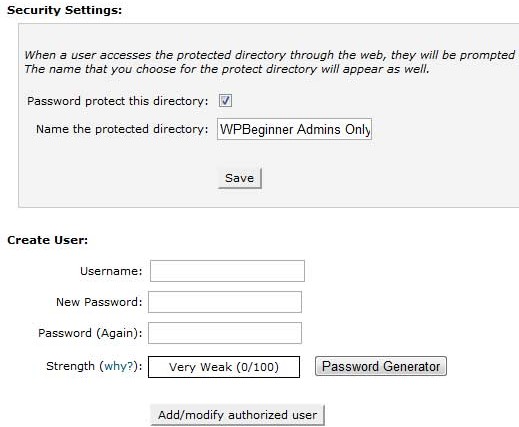
When you click on that, a lightbox popup will show up asking for directory location. Just click on web root. Once you are there, navigate to the folder where your WordPress is hosted. Then click on the /wp-admin/ folder. You will see a screen like this:
Simply check the box to password protect the directory. Then create a user for the directory. That is it. Now when you try to access your wp-admin directory, you should see an authentication required box like this:
Sometimes this can happen depending on how your server is configured. To fix this issue, open your main WordPress .htaccess file and add the following code there before the WordPress rules start.ErrorDocument 401 default
Well there you have it. Now you have double authentication for your WordPress.
Here is how to fix the Admin Ajax Issue
If you password protect your WordPress Admin directory, then it will break the Ajax functionality in the front-end (if it is being used). If you have any plugins that are using ajax in the front-end, then this is how you fix that issue:
Open the .htaccess file located in your /wp-admin/ folder (This is NOT the main .htaccess file that we edited above).
In the wp-admin .htaccess file, paste the following code:
<Files admin-ajax.php>
Order allow,deny
Allow from all
Satisfy any
</Files>
Email any time or call 01480 26 00 00 014 80 26 00 00